
CASE STUDY: 3D Concrete Printing a Massive Pergola Structure
- Apr 29
- 4 min read
Printing and Installation of a Massive 3DCP Pergola
Project Location: NEOM
Client: Wetland
Project Date: November 2024
Dimensions: 3.2 X 2.8 X 1.85 M
Total Printed Weight: 3.3 Tons
Download the Full Case Study Document: 3D Concrete Printing a Massive Pergola Structure

PROJECT DESCRIPTION
CLIENT VISION & PROJECT BACKGROUND
The client required innovative architectural structures to be installed within a wetland environmental project aimed at wastewater treatment and ecological landscaping.
The wetland project is designed to naturally treat wastewater and reuse it for irrigation and plantation purposes, supporting the client’s goal of environmental sustainability and circular water management.

To align with this sustainability vision, the client explored advanced construction technologies - Concrete 3D Printing.
As part of the site development, the client requested several 3D printed elements including:
Pergolas
Outdoor furniture
Seating elements
Tables and landscape structures
This case study focuses specifically on the design, printing, and installation of the 3D printed pergola.
DESIGN STRATEGY
STRUCTURAL DESIGN APPROACH
The pergola structure presented a unique engineering challenge, the upper portion of the pergola extends outward significantly, creating high overhang forces post-printing handling and post-installation.
Additionally, the structure needed to be flipped after printing, which required careful consideration of:
Structural stability
Layer bonding strength
Safe lifting provisions

Credits: Pergola Design and 3D Models by Studio Libani
Overlap Layer Printing Strategy
To improve structural integrity, the designer implemented a overlap layer methodology.
Instead of printing a single continuous wall layer:
Each printing layer was composed of three overlapping sub-layers, creating an interlocking bonding pattern.
Benefits of this method:
Improved layer-to-layer adhesion
Increased structural integrity
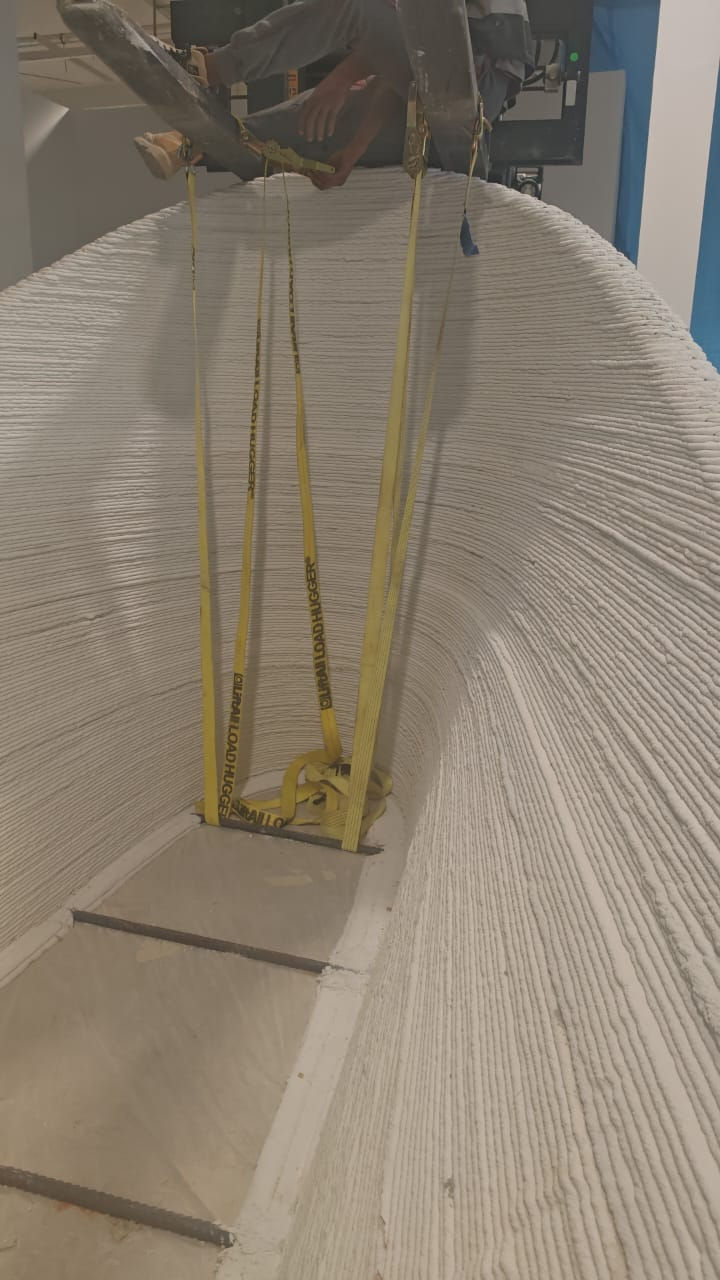
Integrated Lifting Base Design
A special base platform was designed as part of the print.
Functions of the base:
Provides lifting points for post-printing handling
Serves as a stable ground leveling platform
Ensures safe transportation and installation
Printing sequence:
First, the 3-layer base platform was printed
The pergola structure was printed on top of the base
Overhang Challenge
Typical 3D concrete printing systems safely support overhang angles up to approximately 20°.
However, the pergola design included overhang angles reaching approximately 40°, which could not be resolved purely through design modification.
Therefore, the overhang challenge was addressed through specialized printing techniques, discussed in the next section.

PRINTING STRATEGY
Polymer Fiber Mesh Reinforcement
To support the 40° overhang geometry, a polymer-fiber mesh was inserted during printing. Application method:
Installed every 5 printed layers
Mesh connected both sides of the structure
Provided additional support to prevent layer collapse
This approach significantly improved the tensile support and stability of the overhanging section.

Rebar Reinforcement
Additional reinforcement was provided using 4 mm bent rebars.
Installation strategy:
Installed every 5 layers
Positioned on both sides of the print
Connected layers across the structure
Epoxy Bonding Enhancement
For enhanced layer bonding, Sikadur epoxy adhesive was applied. Application frequency:
Applied every 10 printed layers
Multi-Day Printing Strategy
Due to the significant weight of 3.3 tons, printing the entire structure in a single day would have introduced risks related to insufficient curing and structural deformation.
Therefore, the printing was conducted over three days. Procedure:
Printing paused at the end of each day
Structure allowed to partially cure overnight
Next day, a dry run was performed to verify:
Printer alignment
Level accuracy
Layer matching
Before resuming printing:
A full layer of Sikadur bonding epoxy was applied.

Critical Decision Making During Printing
Real-time decision making played a crucial role in the project. During Day 2 of printing, a crack was observed in the structure while printing was in progress.
Continuing the print would likely have caused structural collapse, potentially wasting approximately 2 tons of printed material.
The team made the immediate decision to:
Stop printing
Allow additional curing time
Reinforce the cracked area with Sikadur epoxy
Printing resumed the following day after the structure gained sufficient strength.
This proactive intervention ensured successful completion of the structure without material loss.
TRANSPORTATION PROCESS
Handling and Movement of the Printed Structure
After sufficient curing, the pergola structure was prepared for transportation and installation
1- Lifting Procedure & Internal Facility Transportation
The pergola was lifted using industrial lifting belts attached to the integrated lifting provisions in the base.
This allowed safe handling without damaging the printed structure.
The structure was moved using two pallet trolleys.
Carefully transported to the facility exit area.
2- Site Transportation
The pergola was then loaded onto a transport truck and delivered to the project site.

3- At Site
A boom crane was used to lift and position the structure.

4- Installation

INSTALLATION STRATEGY
On-Site Installation Procedure
At the installation site, the pergola was positioned according to the final architectural orientation.
Since the structure was printed in a flipped one side orientation, it was flipped on site to achieve the final design position.

Foundation Preparation
Before installation, the contractor prepared the foundation area by:
Excavating a hole in the ground
Preparing a base foundation

Structural Anchoring
Installation steps:
Approximately 50 cm of the pergola base was embedded below ground level
Steel rebars were installed to connect the structure with the ground foundation
Concrete was poured to secure the base
The surrounding area was filled with sand and compacted
Final leveling was performed to match the existing ground level

This project demonstrates how complex geometries and structural challenges can be successfully executed using advanced 3D concrete printing techniques.
If you are exploring similar applications or facing design constraints, our team can support you from concept to execution.
Download the Full Case Study Document: 3D Concrete Printing a Massive Pergola Structure


